Saturday, November 26, 2011

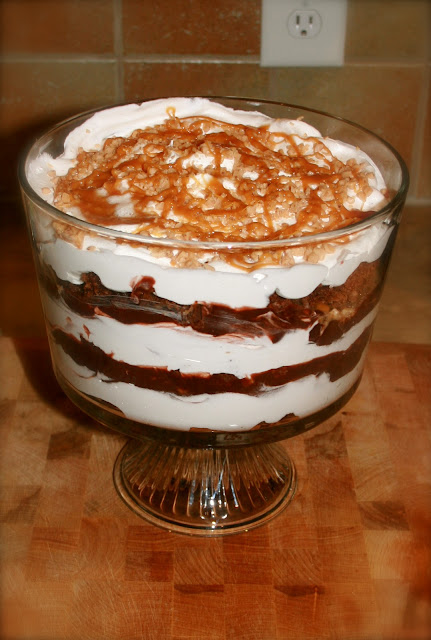
Chocolate, Caramel, and Toffee Trifle

I made this trifle for Christmas last year and Evan's eighty-six year old grandmother LOVED it! This was the only requested dessert for Thanksgiving this year, so I didn't want to disappoint. 
It is super easy to make, and super chocolatey! I've made it couple of different ways, but this one seems to be the favorite.

Ingredients: 
1 box brownie mix
1 pkg. chocolate fudge pudding
3 cups cold milk
2 tubs cool whip
1 tsp vanilla
1 bag toffee bits
Caramel Sauce 

Directions:
  • Prepare the brownies according to the package. I would make these at least a day in advance so they don't get too mushy in the trifle. Once they have cooled break them into small bite size pieces.
  • Mix chocolate pudding mix and 3 cups of milk. Whisk until it begins to thicken. Refrigerate for an hour.
  • Mix cool whip and vanilla until incorporated.
  • Layer your trifle in this order:
1. Chocolate pudding
2. Brownies
3. Cool Whip
4. Toffee bits
5. Drizzle with caramel
Repeat two more times and end with the toffee and caramel at the very top.  

*Substitutions: Oreos & Brownies; Reese's Peanut Butter Cups & Brownies

Friday, November 25, 2011

Winter Bucket List...

I was a bit annoyed with people completely skipping Thanksgiving and jumping straight into Christmas, but now that it is officially winter I am ready to start on my bucket list! I came across this on Pinterest and decided to make my own! 

I did not create this bucket list, I did write the list of things to do, but someone else made the super cute background. You can make your own too! Just download this blank template and create your own list by editing it in Picnik. So easy! 
I printed mine out to fit an 8x10 picture frame and placed it on our end table. Merry Christmas!

Tuesday, November 22, 2011

Baked Mac n Cheese with Jalapenos

I have to tell you this might be one of the best versions of mac & cheese I've ever made. The perfect balance of salty cheese & slightly spicy jalapeno is amazing. This is definitely a keeper. I have no doubt that you will absolutely love it.
Recipe adapted from Rachael Ray

Ingredients:
1/2 pound elbow macaroni (I used penne)
3 tablespoons butter
2 cloves of garlic, minced
1/4 cup of onions, finely diced
2 tablespoons flour
2 cups skim milk
½ cup pickled jalapenos from a jar, diced
1 large egg
½ cup sharp cheddar, shredded
½ cup Italian blend, shredded
4 oz reduced fat cream cheese
1/2 cup light sour cream
1 tsp kosher or sea salt
1 tsp fresh black pepper
1 teaspoon smoked paprika
1 cup bread crumbs 

Directions
Preheat oven to 350 degrees.

In a large pot of boiling, salted water cook the pasta until almost done.

While the pasta is cooking, in a separate pan, melt the butter. Cook the garlic and the onions until soft, about 4 minutes. 
Whisk in the flour, make sure it’s not lumpy. Stir in the milk, jalapenos (add a little juice from the jar, about 2 tsp), and paprika. Simmer for ten minutes. Allow to cool a bit. 
In a small bowl, beat the egg with a little of the milk mixture, then add the egg to the pan and stir until combined. Stir in 3/4 of the cheese. Season with salt, pepper and stir. 
Fold the macaroni into the cheese mixture and pour into a baking dish. Top with remaining cheese. Top the macaroni with the bread crumbs. 
Bake for 30 minutes. Remove from oven and rest for five minutes before serving.

Caramel Apple Pie

What's more fall than apple pie?? We had some close friends over for dinner and I was dying to make this apple pie recipe. I've always been intimidated by homemade pie, particularly by making the crust. I've never really made a pie before, so I was a bit nervous for my first attempt in front of guests! 
For this little dinner party I chose to skip out on the homemade crust and put my faith in Pillsbury. Turns out the pie came out really well and I had everyone surprised that it was my first attempt. Maybe making a pie isn't quite as intimidating as I always thought, or I just got lucky. 
Next time I'm tackling that pie crust! I have to give Southern Living Magazine the credit for this pie recipe. However, I've slightly adapted it to give it my own twist!

Caramel Apple Pie
Ingredients: 
4 pounds Granny Smith apples
1/4 cup lemon juice
1 tsp salt
1/4 cup granulated sugar
1/4 cup brown sugar
2 tbs flour
1 tbs cinnamon
1 tsp fresh grated nutmeg

Caramel Sauce:

10-15 caramel candies 
2 tbsp milk
1 tsp vanilla

Crust:

1 (14.1-oz.) package refrigerated pie crusts
1 egg white
2 tablespoons granulated sugar

Vanilla ice cream

Directions:

1. Preheat oven to 350 degrees. Peel apples, and cut into 1/2-inch-thick wedges. Toss apples with lemon juice, salt, cinnamon, nutmeg, brown sugar and granulated sugar.

2. In a microwave safe bowl melt the caramel candies in 20 second intervals. Add the milk and vanilla and stir until it reaches a silky smooth consistency.

3. Spray your skillet with non-stick cooking spray and place 1 pie crust in the skillet. Spoon apple mixture over pie crust, and drizzle the caramel sauce over the apples. Top with the remaining pie crust. Whisk egg white until foamy. Brush top of pie crust with egg white; sprinkle with 2 Tbsp. granulated sugar. Cut 4 or 5 slits in top for steam to escape.

4. Bake at 350 degrees for 1 hour to 1 hour and 10 minutes or until golden brown and bubbly, shielding with aluminum foil during last 10 minutes to prevent excessive browning, if necessary. Allow the pie to rest before serving, the caramel needs time to thicken or your will be serving apple pie soup. Serve with vanilla ice cream.

Monday, November 21, 2011

S'mores in a Jar

I have decided to spend my week off for Thanksgiving Break baking and blogging :) It seems like everywhere I go: the mall, grocery store, Starbucks, and even the gas station, is in total Christmas mode. What happened to Thanksgiving?? Well, I suppose I should follow along with the rest of the world and start decorating and shopping! I came across some super cute Christmas gift ideas on Pinterest and couldn't wait to make them for some friends.

The first one I just absolutely loved was S'mores in a jar. It's an entire recipe of ingredients in a mason jar. How cute is that?! What I love even more is that you use Teddy Grahams. I haven't eaten these in YEARS, and trust me, they are still just at yummy!

Layer in a large wide mouthed 1 quart mason jar:

  • 1 1/2 cups graham cracker crumbs (one sleeve of crackers, crushed)
  • 1 1/2 cups miniature marshmallows
  • 1 1/2 cups chocolate chips or mini Hershey Kisses or M&M’s
  • 1/3 cup brown sugar
Click here for the printable recipe card. 


Salted Caramel Shortbread

I've recently become obsessed with Starbucks' Salted Caramel Mocha and as soon as I saw this recipe my mouth started watering! There’s just something about that unique flavor that keeps you wanting just one more bite. If you haven’t tried it yet because you think salt on a dessert is weird, don’t worry I completely understand. I used to feel that way too. 
Many of the recipes I saw also had a thin layer of chocolate on top. I have opted to forgo the chocolate since the caramel is very RICH and DECADENT. But, by all means, feel free to enhance these salted caramel bars in any way you like. And trust me, just one small bite will totally satisfy that sweet tooth! 

Recipe adapted from The Curvy Carrot
For the shortbread layer:
1 cup all-purpose flour
1 tsp. baking powder
1/8 tsp. salt
1/2 cup (1 stick) unsalted butter, at room temperature
1/4 cup sugar

For the caramel layer:
1 stick unsalted butter, cut into cubes
1/2 cup sugar
1 can sweetened condensed milk
2 tbsp light corn syrup
1/2 tsp sea salt

To make the shortbread layer, preheat the oven to 325° F.  Line a 9 x 13-inch baking pan with parchment paper or aluminum foil.  In a small bowl combine the flour, baking powder and salt. Stir with a fork to blend, and set aside.  In the bowl of an electric mixer, beat the butter and sugar on medium speed until well blended, about 1-2 minutes.  With the mixer on low speed blend in the dry ingredients just until incorporated.  Transfer the dough to the prepared baking pan and press in an even layer over the bottom of the pan.  Bake 15-18 minutes or until golden.  (If the crust puffs up a bit while baking, just gently press it down while it is cooling.)  Let it cool completely.

To make the caramel layer, combine the butter, sugar, corn syrup and condensed milk in a medium saucepan over medium heat.  Heat, stirring occasionally, until the butter is melted.  Increase the heat to medium-high and bring to a boil.  Reduce the heat to maintain a simmer, stirring constantly.  Continue simmering and stirring until the mixture turns an amber color and thickens slightly.  Pour the mixture over the shortbread layer, smooth the top, and sprinkle with sea salt. Allow to cool completely in the refrigerator and set before cutting.

Saturday, November 19, 2011

Oreo Brownies

 
In my opinion, Oreos are one of the best cookies out there. I mean, you can never get tired of them! They are the perfect little sweet snack and you can do a million things with them. These Oreo brownies are simply amazing. I made these for my Yearbook kids because we met our first deadline and they were a HUGE hit. The combination of brownies, cream cheese, whip cream, and OREOS...you just can't go wrong!

Oreo Brownies
Recipe adapted from Cookies and Cups
Ingredients:
1 box brownie mix – with ingredients to prepare them according to the package directions
1 (16.6 oz) package Oreo cookies divided equally in 1/3, all coarsely chopped
1 (8 oz) tub of Cool Whip thawed in fridge
1 8 oz block of cream cheese softened
1/2-1 cup powdered sugar

Directions:
Prepare brownie batter according to package directions, folding in 1/3 of the chopped Oreos.
Bake according to package directions, until a toothpick inserted 1 inch from the edge comes out clean. Let brownies cool completely.

Meanwhile in your mixer bowl beat the cream cheese and powdered sugar until combined and smooth.

With a spatula fold in the Cool Whip and another 1/3 of the coarsely chopped Oreos.
Spread the cream cheese mixture on top of cooled brownies. Top with the last 1/3 of the Oreos.

Refrigerate for at least 30 minutes or until ready to serve. Cut into squares.

Sunday, November 13, 2011

Pizza Pizza!

Homemade pizza is a weekly occurrence for us. There is simply nothing that quite matches homemade pizza - it’s infinitely flexible, super easy to make, and delicious. Best of all, if you plan ahead a bit, it doesn’t take long to make, either – you can have a semi made-from-scratch pizza on the table in a half an hour. My mom is known for making homemade pizzas and she finally shared her little secret with me for the perfect crust! 
This Hot Roll Mix is absolutely perfect for making the perfect pizza crust. It's really easy and doesn't take very long at all. I love it because it's a tastes just like you made it from scratch!
Follow the directions on the back of the box to make one thick crust pizza. 
Once your dough is ready, drizzle 1 tablespoon of olive oil and sprinkle Italian seasonings, Parmesan cheese, and minced garlic. I like to let it bake for 10-12 minutes first and then add your toppings.
After about 10 minutes add your tomato sauce (we like to add some pesto too), and toppings of your choice. We just used what he had on hand already (green peppers, onions, tomatoes, and cheddar cheese). 

Bake for 25 minutes or until golden brown. Enjoy with a big glass of wine! :)

Saturday, November 12, 2011

Crafty Coasters

I have become slightly obsessed with Pinterest lately and want to make everything I see! I came across a pin for DIY coasters and loved the idea of creating my own with our photos from San Francisco. I printed out a ton of our pictures right after our trip a couple of months ago and then realized I hadn't done anything with them. These are so professional-looking that they make an ideal gift, and they cost less then $5 for a whole set.  You just need some cheap tiles, some paper, a little felt and mod podge. I am planning on making some as gifts for Christmas this year. The whole process is a bit time consuming but super easy and the end result is totally worth it. They turned out so cute! 

What you need:
Ceramic tiles (I found mine at Home Depot for only 16 cents a piece)
Photos (you can also use scrapbook paper or card stock)
Mod Podge
Clear Acrylic Gloss Coating
Sponge applicator
Felt
Tacky Glue (or you could use a hot glue gun)
What to do:
Trace your tiles onto the photos or paper. Trim photo into a square shape, to fit the tile.
Apply Mod Podge to the back of the photo with a sponge applicator, then press down onto tile. Allow to dry completely. Use your fingers to press the paper nice and flat.  Don't lift it up once you get it on or it will rip and turn into a big mess. 

Once dry, apply a layer of Mod Podge with a sponge applicator to the top of the photo.  Use even left-to-right strokes (lines will show).  Allow to dry completely for about 20-30 minutes. Repeat this step 4-5 times. (make sure each coat dries completely before applying the next coat)
Cut out squares of felt for the bottom of your coasters. You could also cut out small circles and put them in the corners of your tiles.
When your tiles are dry, turn them over and glue the felt squares to the back.  I used tacky glue but you can also use a hot glue gun. 

Once the coasters have had 5 layers of Mod Podge applied… and have dried completely, take them on outside.  It’s time to spray with Acrylic Sealer! Lay coasters on wax paper, or something else you don’t mind getting sprayed with some over-spray. The Acrylic Sealer is an important step, it will seal the project.  This will ensure the coaster is waterproof, and can handle wet glasses sitting on the coasters. You’ll want a strong coat of sealer on each coaster.  I applied a total of 5 coats of sealer, allowing each to dry completely before applying the next coat.

Roasted Tomato Soup

There's nothing better than a yummy bowl of soup on a cold day. I stumbled upon this recipe at Smitten Kitchen and couldn't think of anything better to have for lunch. I mean, who doesn't like a combination of a grilled cheese and tomato soup?? I pretty much had everything on hand to make this, except the stock. So, I improvised and made my own vegetable stock! It turned out perfect and the recipe is also below. Enjoy!

 
Soup
3 pounds plum tomatoes, halved lengthwise
2 tablespoons olive oil
3-4 small cloves garlic, unpeeled
1 onion, quartered
1/4 teaspoon (or more to taste) dried crushed red pepper
4 cups vegetable stock

Grilled Cheese Top
4 1-inch slices from a large loaf of whole wheat bread toasted until hard and lightly buttered on one side
1 cup grated cheddar


Make soup: Preheat oven to 400°F. Place tomatoes, cut side up, on large baking sheet. Sprinkle generously with salt and pepper. Drizzle tomatoes with olive oil. Add peeled garlic and onions. Roast until tomatoes are brown and tender (garlic will be very tender), about 1 hour. Cool slightly.
Transfer garlic, onions, and tomatoes and any accumulated juices to a food processor and pulse machine on and off until tomatoes are a chunky puree. Transfer tomatoes to medium pot and crushed red pepper and stock and bring to a boil Reduce heat to a simmer and cook, uncovered, for 25 minutes. Remove from heat and adjust seasonings to taste.
Create cheddar lid: Preheat broiler on high. Arrange four ovenproof soup bowls or large mugs on a large, foil-lined baking sheet. Float toast slice(s) in each bowl, buttered side up and divide grated cheese generously over top. Broil soups on tray for about 3-5 minutes, until cheese on top is bubbling and brown at the edges. Serve immediately.

Vegetable Stock

  • 1 tablespoon unsalted butter
  • 1 tablespoon olive oil
  • 1 onion, coarsely chopped
  • 2 carrots, coarsely chopped
  • 1 stalk celery, coarsely chopped
  • Several sprigs fresh thyme (I used dried thyme)
  • Several sprigs fresh flat-leaf parsley
  • 1 dried bay leaf
  1. In a medium stockpot over medium-high heat, melt butter and olive oil. Add onion, and cook, stirring, until caramelized, about 8 minutes. Add carrots and celery; cook until tender, about 15 minutes.
  2. Add 4 cups cold water, thyme, parsley, and bay leaf. Bring to a boil, reduce heat, and let simmer about 1 hour; liquid should be highly flavored.
  3. Remove from heat, and strain stock through a fine sieve, pressing on vegetables to extract juices. Discard vegetables. Stock can be refrigerated for 3 to 4 days or frozen for up to 3 months.

Wednesday, November 9, 2011

S'mores Cookies

I have recently become slightly obsessed with anything s'mores related. I usually substitute Nutella in any recipe that I can, but these turned out perfect with good ole' homemade chocolate chip cookies. These S'mores Cookies are a perfect quick and easy dessert. I found these surfing the web on Pinterest so I had to give them a try. They have a graham cracker base with a chocolate chip cookie and marshmallow topping it. The crunch of the graham cracker with the gooey cookie is the perfect combination.
S'mores Cookies
Recipe adapted from The Girl Who Ate Everything

1 stick unsalted butter, softened
1 cup brown sugar, packed
½ cup granulated sugar
2 large eggs
1 teaspoon vanilla
1 teaspoon baking soda
½ teaspoon salt
2 ½ cups flour
1/2 cup semi-sweet chocolate chips
1 cup mini marshmallows
1-2 packages graham crackers, broken into squares

Directions:
Preheat the oven to 375 degrees. Line baking pans with aluminum foil or parchment paper. I used a 9x13 pan but you can use any pan you have on hand.

Lay out graham crackers side by side on the pans as close as possible (they should be touching). I used 16 graham cracker squares. You may have to add or remove graham crackers according to how much dough you have. If you want your cookies thicker you will use more dough and less graham crackers.

In a medium bowl, whisk together the flour, baking soda, and salt to combine. Set aside.

In the bowl of an electric mixer, cream butter with white and brown sugar until light and fluffy. Add the eggs and vanilla and mix until combined.

Add the flour mixture to the butter mixer and combine on low speed.

Fold in the chocolate chips and marshmallows. Chill dough in refrigerator for 1 hour.

Place 1 tablespoon of dough on graham crackers about 1 – 1 ½ inches apart. I averaged about 1 1/2 tablespoons of dough per graham cracker square as seen in the picture below. Press down slightly with fingertips.
Bake for 10-12 minutes or until dough is beginning to turn golden brown at the edges. Remove to a wire rack to cool. For clean cutting make sure cookies are completely cool and cut with a sharp knife.